Installing software on Linux is very different from installing software on Windows. On Windows, you usually go to the website of the software provider to download and install a specific software. So, if you wanted to install 5 different software, you have to visit 5 different websites and install each software one by one. On Linux, however, almost every piece of software is provided by your distro. So, you don’t need to visit multiple sites. You can even install all the software you need with a single command if you are comfortable with command-line interface.
Here, you will learn both graphical and command-line way of installing software but I highly recommend learning command-line method. It is more efficient method.
1. Graphical Method
1. Software Center
If you are using Linux with some desktop environment other than KDE Plasma, you are likely to have an app store named “Software” which will allow you to install applications. It may have a different name depending on what distro you are using but its package name is mostly “gnome-software“. KDE Plasma also has an app store named “Discover” but that is a whole other software. If you are using KDE Plasma, you can install “gnome-software” by searching for it in Discover.
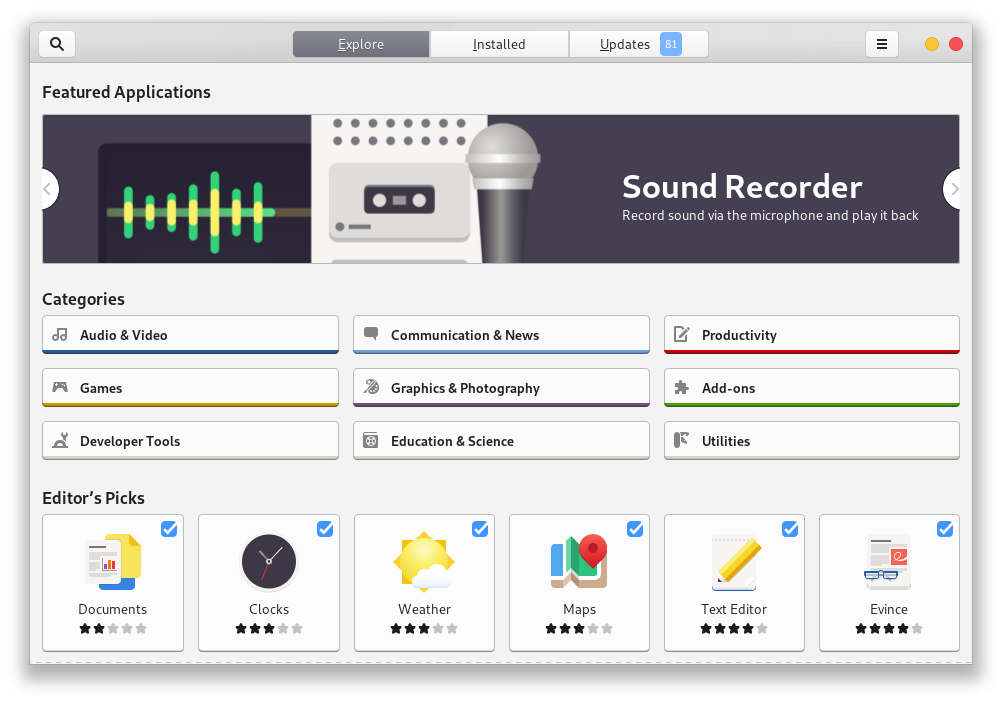
When you open this Store app, it looks something like this
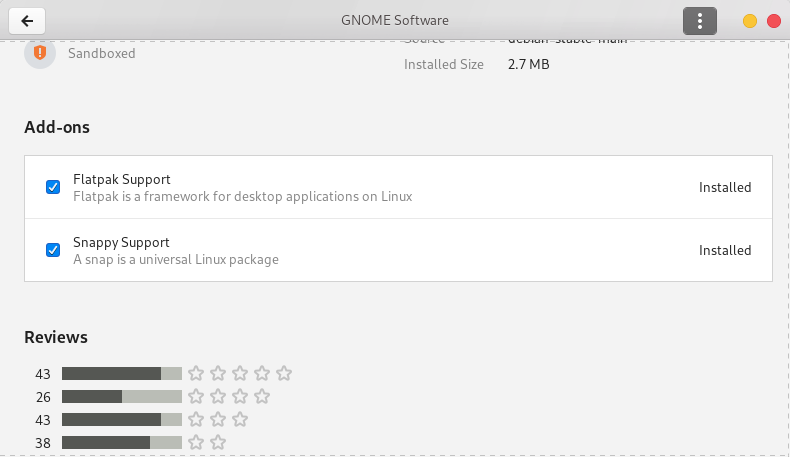
Now, you can search for an app and install it but if you want to add more apps to this app store, search for store’s own name “Software”, Click on it from search results and scroll down. You will see two options under Add-ons waiting to be checked. Select both options like below
Once both are installed, open terminal and copy and paste the following command and hit Enter.
sudo flatpak remote-add --if-not-exists flathub https://flathub.org/repo/flathub.flatpakrepo
Once the command finishes running, click on three dots in upper right corner of the window and sign in to snap store. After you have signed into the snap store, you should click on Updates option that is given in the middle of title-bar of store window, then click on refresh button given on top left corner, click yes if asked anything and let the store search for an up-to-date application list. Now you can search for an app and install it.
Note: Sometimes, when you search for an app, there will be more than one occurrences, it will save you a lot of disk space if you install the one whose source is not dl.flathub.org or Snap Store. Source of dl.flathub.org is displayed right in the search list and you can check the source of every app by clicking on it and scrolling down.
If your only options are a flatpak from flathub and a snap from Snap Store, you should know that snaps are much more light weight than flatpaks but they also take some time before their first run after each time you start your computer.
An example would be gedit (a text editor). It shows up three times in search results as gedit, gedit and Text Editor when I search for gedit.

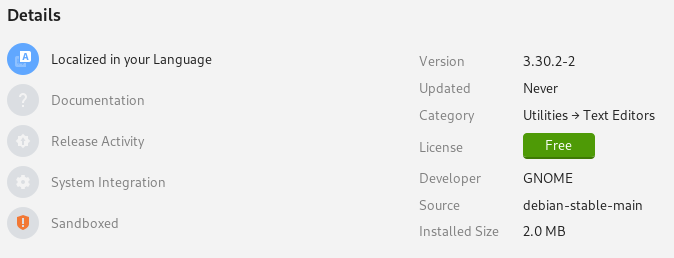
As you can see, first result is from dl.flathub.org. Source: dl.flathub.org is displayed right under the description. The second result is from debian repos as you can see from below picture.
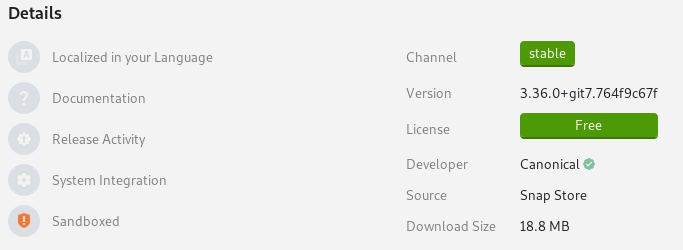
The third one named Text Editor is obviously from Snap Store.
2. AppImage
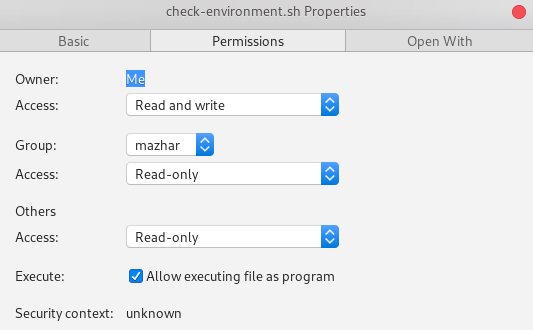
An AppImage is an app file that is run without installing. You just need to mark it as executable. You can do so by right clicking on the AppImage you have downloaded, selecting properties, clicking on permissions and then checking the box that says Allow executing file as program.
After it is made executable, you just need to double click on the file to run it. You can download AppImages from following sites
Installing an AppImage: If you want to install AppImages instead of just running them from where they are downloaded, you have two options; AppImage Launcher and AppImaged. I prefer the latter. You can download AppImaged from their github page. Download appimaged-x86_64.AppImage from assets section of github page if your machine is 64bit. Here is a direct download link to the file. You can install this software by making it executable as taught earlier, opening terminal in the folder where you downloaded it and running the command “./appimaged-x86_64.AppImage --install“. This will install appimaged for current user. Now, you can install an AppImage just by putting it in one of the following folders.
- ~/Applications, ~/bin or ~/.local/bin
- /Applications, /usr/local/bin or /opt
- Applications folder in root of any mounted drive
Note: ~/ in the beginning means folders in your home directory and / in the beginning means folders in root directory of your current linux installation.
2. Command Line Method
Graphical method of installing software was same for almost every distro but there are a number of tools for installing software through command-line called package managers. Each package manager has its own way of interacting with user and is available on a specific set of distros. Two package managers of different types are never available on a single distro. Some of the famous package managers are apt(Debian/Ubuntu), pacman(Arch/Manjaro), and dnf(Fedora).
1. apt
apt, dpkg and aptitude are command-line package managers for Debian, Ubuntu and their derivatives like Pop OS, Linux Mint, Deepin, Parrot OS, etc. dpkg is only for advanced users/developers and works only on local files (the files you have already downloaded). The other two have same usage method but if you want to use aptitude you will have to install it first. Here, we will discuss only apt package manager.
To update the list of available software run “sudo apt update“.
To search for a package run “sudo apt search <package-name>“.
To install/upgrade a package run “sudo apt install <package-name>“.
To install a local(already downloaded) .deb file run “sudo apt install /path/to/deb-file“. Replace /path/to/deb-file with real path to your .deb file. If it is in current directory type ./ before your filename like “./some-package.deb“.
To upgrade every upgradable package run “sudo apt upgrade“.
To see a list of every upgradable package run “sudo apt list --upgradable“.
To upgrade every upgradable package and also remove unnecessary packages to free disk space run “sudo apt full-upgrade“.
To uninstall/remove a package run “sudo apt remove <package-name>“.
To remove a package along with its configuration run “sudo apt purge <package-name>“.
Note: If you forget anything, you can always run the command “sudo apt --help” for short help or “man apt” for detailed manual on apt.
2. pacman
pacman is a package manager for Arch, Manjaro and their derivatives.
To search for a package run “pacman -Ss <package-name>“.
To install a package run “pacman -S <package-name>“.
To upgrade all upgradable packages run “pacman -Syu“.
To remove a package run “pacman -Rs <package-name>” and if it fails for some reason you can try running “pacman -Rsu <package-name>“.
Note: For more help visit this page or run the command “man pacman“.
3. dnf
dnf is a package manager for Fedora and derivatives. It is a replacement of yum package manager. They both have same interface of usage.
To check for updates run “sudo dnf check-update“.
To search for a package “sudo dnf search <package-name>“.
To install a package run “sudo dnf install <package-name>“.
To upgrade every upgradable package run “sudo dnf upgrade“.
To downgrade a package run “sudo dnf downgrade <package-name>“.
To remove a package run “sudo dnf remove <package-name>“.
Note: Run the command “man dnf” for fully detailed manual on dnf.
Other package managers
Some other distros use their own package managers like Clear Linux uses swupd, OpenSUSE uses zypper, etc. If you are using any of those distros you can learn about their package managers by running the man command with the name of their package manager. For example, “man swupd” and “man zypper“.
Important Tips:
You may have noticed that the commands are very long and it would be tiresome and boring to type those complete commands. You can make aliases of those commands. For example I made an alias “ins” of the command “sudo apt install“. Now I can run the command “ins vlc” instead of “sudo apt install vlc” to install vlc media player. You can also do this. To do this you need type in some lines at the end of ~/.bashrc file using any text editor or you can make another file ~/.bash_aliases and put your aliases in there. In any case, you need to type “alias <alias>=<command>” on each new line but replace <alias> with alias of your choice and <command> with command of your choice. In my case, I put alias ins=’sudo apt install’ in my ~/.bash_aliases file to make that alias. You may have noticed single quotes around my command. They are necessary in this case because there are blank spaces in the command. Here is my ~/.bash_aliases file if you wanna take a look at aliases I use.
Note: Aliases will start working after you next log in or restart your computer. If you want them to start working right after you put them in ~/.bashrc or ~/.bash_aliases file, you need to run the command “source ~/.bashrc” in terminal after you have put your aliases in ~/.bashrc or ~/.bas_aliases file.
Note: Above method of aliases will work only if you are using bash shell. If you don’t know what I’m talking about, you are most probably using bash shell. But if you are using any shell other than bash, you will need to put these aliases in their rc file like ~/.zshrc file for zsh shell.
–~<= Good Luck =>~–